Learning To Draw A Book: A Simple Guide For Everyone
Have you ever felt a little spark of inspiration to put pencil to paper, or perhaps, to try out a digital canvas, and create something truly special? Maybe you're looking for a quiet, relaxing activity, or perhaps you just want to add a charming element to a bigger picture you're working on. Well, learning how to draw a book can be a surprisingly fun and rewarding experience, you know, whether you're just starting out or looking to brush up on some basic shapes. Books are such a common sight in our daily lives, and capturing their simple form can open up a whole world of drawing possibilities.
It's a pretty neat feeling, isn't it, when you manage to sketch something recognizable? A book, in its very essence, is a collection of pages held together, usually within a cover. This simple structure makes it a fantastic subject for anyone wanting to practice their basic drawing skills, especially when it comes to understanding shapes and a bit of perspective. You don't need fancy art supplies, actually; just something to draw with and a surface to draw on, and you're good to go.
So, we're going to take a gentle stroll through the process of drawing a book, from its most basic form to adding a little more detail, and even talk about how some online drawing tools can help you along the way. We'll look at a few ways to approach it, so, you can pick what feels right for you. It's really about having a good time and seeing what you can create!
- Unveiling Russell Peters Net Worth A Journey To Financial Success
- Unveil Hidden Truths Embark On A Journey Of Discovery With I Have No Knowledge Of Any Of This
- Unveiling The Rising Star Discover The Story Of Mason Martin Karns Citys Quarterback Sensation
- Unveiling The Life And Legacy Of Nate Bossi Discoveries And Insights Within
- Unveiling The Enigma Discover The Genius Behind Eric Von Haessler
Table of Contents
- Getting Started with Basic Shapes
- Adding the Details to Your Book
- Drawing an Open Book
- Stacking Up Your Books
- Using Digital Tools for Your Drawings
- Tips for Making Your Book Drawings Even Better
- Frequently Asked Questions About Drawing Books
- Wrapping Up Your Artistic Adventure
Getting Started with Basic Shapes
When you're trying to figure out how to draw a book, the very first step, you know, is to think about the most basic forms. A book, at its heart, is a rectangular prism. It's like a box, but usually flatter. This is where we begin, with simple geometric shapes that are pretty easy to put down on paper or a digital canvas.
The Simple Rectangle
Start by drawing a plain rectangle. This will be the front cover of your book. Don't worry about making it perfect right away; just get the general shape down. You might want to make it a bit taller than it is wide, or perhaps wider than it is tall, depending on the kind of book you have in mind. Some folks, too, find it helpful to use a ruler for this part, especially if they're aiming for a very neat look, but a freehand approach is perfectly fine for practice.
If you're using an online drawing application, like those free ones that let you create digital artwork, you might find a tool that helps you draw perfect rectangles. This can be a real time-saver, actually, and helps you get a clean start. Just pick your drawing tool, select the rectangle option, and drag it out on your screen. It's a very straightforward way to begin, and it takes away some of the fuss of trying to draw straight lines yourself.
- Unveiling The Enigma The Mysterious Fate Of Clarence Thomass First Wife
- Jenna Lyons Height Surprising Truths And Fashion Revelations
- Tori Dunlaps Net Worth Unlocking The Secrets Of Financial Success
- Unveiling The Extraordinary World Of Batya Ungarsargon Through Wikipedia
- November Rain Batman Fanfiction Ao3
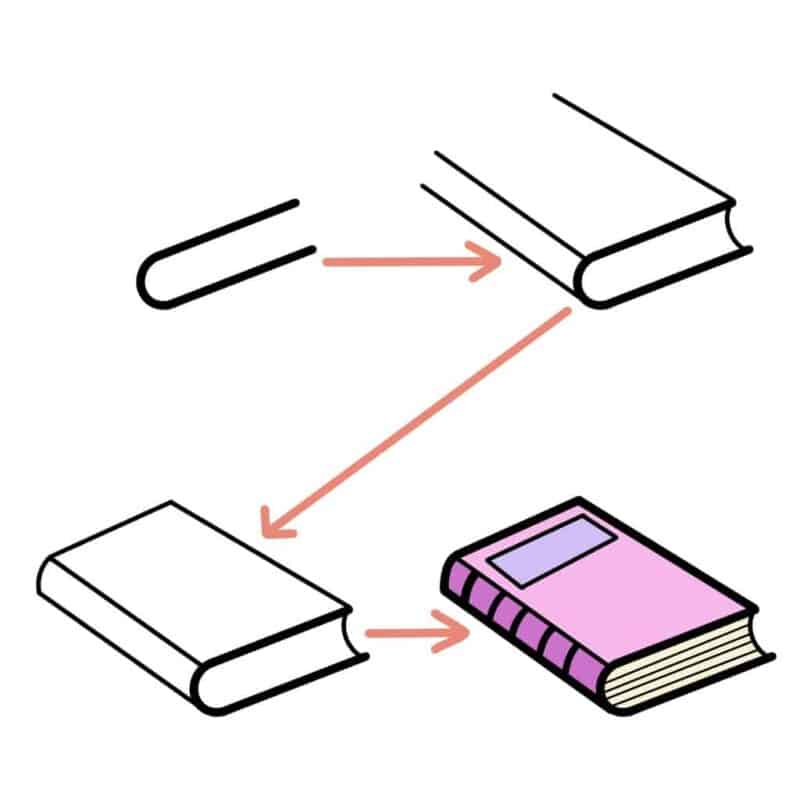
Giving It Depth: Making It 3D
Now, a flat rectangle looks like a piece of paper, but a book has thickness. To make your book look like it's a real object, you need to add some depth. From each corner of your first rectangle, draw a short line going diagonally upwards and to the right, or perhaps downwards and to the left, depending on your preferred perspective. Make these lines parallel to each other, which means they should go in the same direction and never meet. This step is, you know, quite important for giving your drawing that three-dimensional feel.
After drawing these diagonal lines, connect their ends with two more lines. One line will connect the top two diagonal lines, creating the top edge of the book, and the other will connect the side two, forming the side edge. You'll end up with a shape that looks like a rectangular box. It's almost like you're building a little block, and that, is that, the core of your book's structure. Remember, the shorter these diagonal lines are, the thinner your book will appear. Longer lines will make it look like a very chunky volume.
Adding the Details to Your Book
Once you have the basic 3D shape down, it's time to add the bits and pieces that make it clearly a book. These small additions really bring your drawing to life and make it look more realistic. It's a bit like adding the sprinkles to a cake, you know, they make it much more appealing.
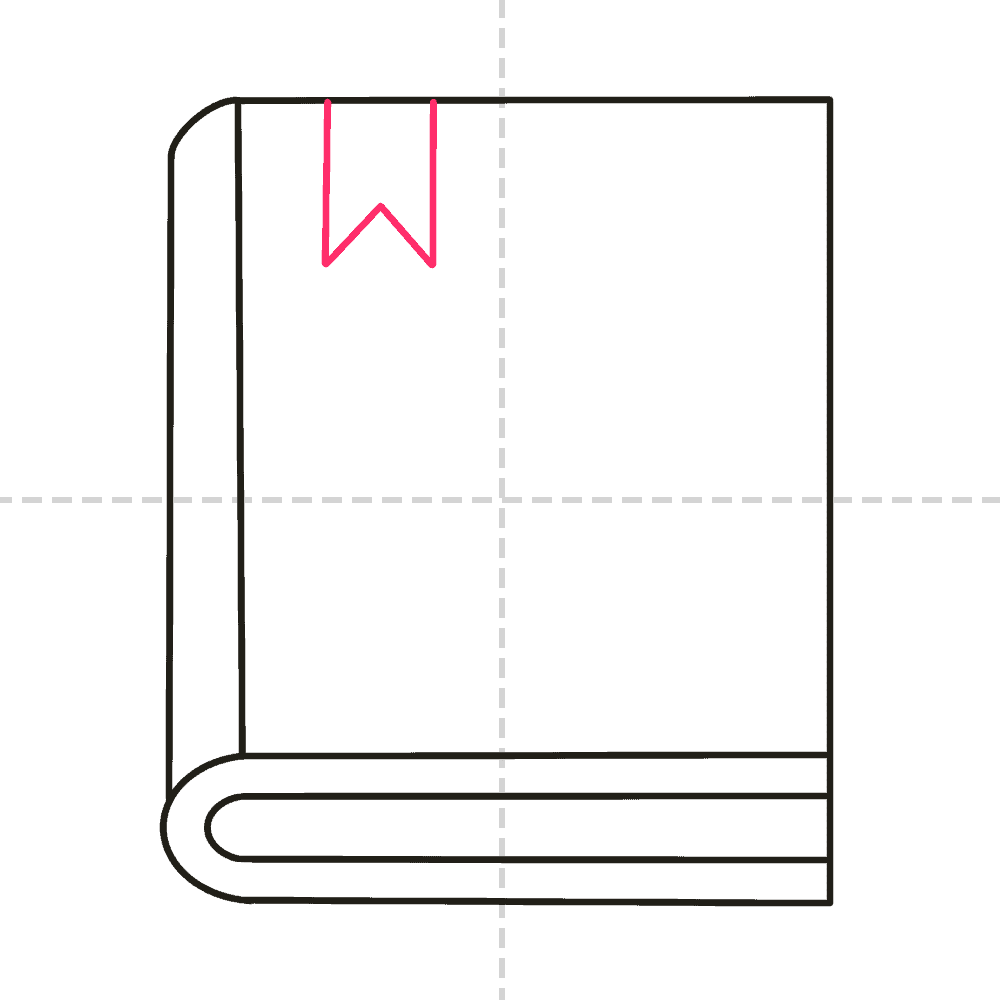
The Spine and Pages
The spine is the part of the book where the pages are bound together, and it's usually visible from the side. To draw the spine, add a thin rectangle along one of the side edges of your 3D box. This rectangle should follow the same perspective as the rest of your book. It gives the book a bit of a bend, making it look like the pages are held together. You might want to make it slightly curved to suggest the natural curve of a book's binding, or keep it straight for a very rigid look.
For the pages, imagine the edges of all those sheets of paper. On the open side of your book (the side opposite the spine), draw a series of very thin, parallel lines. These lines represent the individual pages. You don't need to draw hundreds of them; just a few lines close together can give the impression of many pages. Sometimes, too, people add a slight wave or ripple to these lines to show that the pages aren't perfectly flat, which is a neat little touch.
Cover Art and Texture
Now for the fun part: making your book unique! You can add a title, an author's name, or even a simple design to the front cover and the spine. Think about what kind of book it is. Is it an old, dusty tome? A bright, new paperback? This will influence your choices. For an old book, you might add some faint lines or smudges to suggest wear and tear. For a newer one, maybe some crisp, bold lettering.
If you're using an online drawing application, you can experiment with different brush types to create textures. Some tools offer natural brushes that can mimic the feel of pencil, charcoal, or even paint. You could, for instance, use a slightly rough brush to give the cover a fabric texture, or a smooth one for a glossy finish. You can also pick different colors to really make your book stand out. Some apps, you know, even let you add text directly, which is pretty handy for putting a title on your book without having to draw each letter by hand.
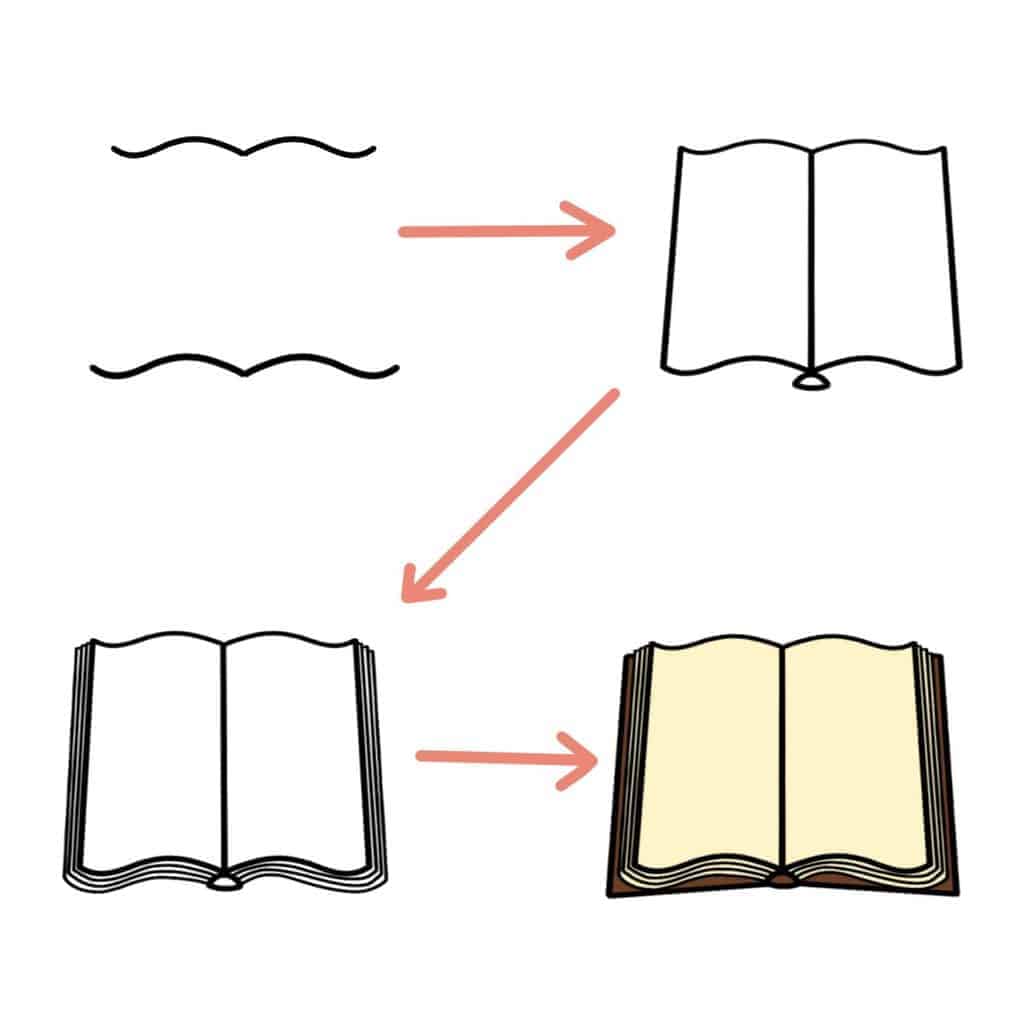
Drawing an Open Book
Drawing an open book is a bit different from drawing a closed one, but it's still about breaking it down into simple shapes. It's a rather common request, actually, and it looks pretty impressive once you get it right.
The Basic Wedge
To start an open book, imagine a "V" shape or a wedge. This will form the basic structure of the open pages. Draw two lines that meet at a point, then draw two more lines parallel to the first two, but slightly further apart at the top. Connect the ends to form a sort of wide, open "V" or a trapezoid. This shape will be the main body of your open book.
You can then add a bit of thickness to this "V" shape, just like you did with the closed book, to give it some depth. From the top corners of your "V," draw short diagonal lines going downwards and inwards, then connect them. This creates the feeling that the pages have some substance. It's more or less like drawing two flat shapes and then connecting them to make them look solid.
Fanning Out the Pages
This is where the open book really comes to life. Inside your "V" shape, draw curved lines that follow the general shape of the "V." These lines represent the individual pages fanning out. They should be slightly curved, mimicking the natural bend of paper. The lines closer to the spine will be more curved, and those closer to the outer edge will be straighter. You know, it's about showing that natural flow.
For the spine of the open book, draw a slightly curved line at the bottom of your "V" shape, connecting the two sides. This line represents the crease where the book opens. You can also add some subtle shading along this crease to make it look like it's bending inwards. Many online tools, by the way, allow you to use layers, so you could put your page lines on one layer and your spine on another, which makes it easier to adjust things without messing up your whole drawing.
Stacking Up Your Books
Once you're comfortable drawing a single book, closed or open, you might want to try drawing a stack of them. This adds a nice touch to any drawing of a bookshelf or a cozy reading nook. It's a bit like playing with building blocks, but with a creative twist, you know.
Start by drawing one book using the methods we just covered. Then, for the next book in the stack, draw it slightly overlapping the first one. You might want to make it a different size or orientation. Some books can be lying flat, while others are standing upright. Remember to keep the perspective consistent. If your first book is angled a certain way, the others should follow a similar angle, or at least be clearly placed in relation to it. It's quite important, actually, to think about how each book sits on top of or next to another.
As you add more books, think about the slight imperfections. Books in a stack are rarely perfectly aligned. Some might stick out a little, or be tilted slightly. These small variations make your drawing look more natural and less stiff. You can also vary the colors and designs of each book's cover to make the stack look more interesting and varied. Perhaps, you know, one book is a bright red, and another is a muted green, adding a bit of visual flair.
Using Digital Tools for Your Drawings
Drawing on a computer or tablet has become incredibly popular, and it offers some neat advantages, especially when you're learning how to draw a book. Many free online drawing applications are available for all ages, and they offer a lot of helpful features that can make your creative process a bit smoother. It's really quite amazing how much you can do without needing traditional art supplies, you know.
Layers and Brushes at Your Fingertips
One of the biggest perks of digital drawing is the use of layers. Imagine drawing the basic shape of your book on one transparent sheet, then adding the spine and pages on another, and finally the cover design on a third. If you make a mistake on one layer, you can just erase or adjust that layer without affecting the others. This is incredibly helpful for beginners and experienced artists alike. My text mentions that you can "paint online with natural brushes, layers, and edit your drawings," which is a pretty good description of what many of these tools offer. It's like having an undo button for every single part of your drawing.
Digital tools also come with a huge variety of brushes. You can find brushes that mimic pencils, pens, markers, watercolors, and even oil paints. This lets you experiment with different looks for your book. Do you want a rough, sketched look? Pick a charcoal brush. Want a crisp, clean line? Choose a fine-point pen. You can even adjust the size and opacity of these brushes, giving you a lot of control over your artwork. It's a very flexible way to work, and it allows for a lot of experimentation, you know, without wasting paper.
Shapes and Exporting Your Work
Remember how we talked about starting with simple shapes like rectangles? Many online drawing tools, like the one described in my text, offer "freestyle drawings and use shapes like rectangles and circles." This means you can easily draw perfect geometric shapes to start your book, which can save you time and make your initial sketch very neat. You can then modify these shapes, making them wider, taller, or even rotating them to fit your perspective. This feature is really helpful for getting the foundational structure just right.
Once you've finished your masterpiece, you'll want to share it! Digital drawing applications often let you "export to popular image formats jpeg, png, svg, and pdf." This means you can save your drawing in a format that's easy to upload to social media, send to friends, or even print out. It's a pretty convenient way to get your art out there, and it means your hard work isn't just stuck on your computer. You know, it's nice to have something tangible or shareable at the end.
Collaborating and Sharing Your Creations
Some advanced online drawing platforms, as my text hints, even allow for collaboration. Imagine joining a shared canvas with friends or other artists, where you can all draw together in real-time. This can be a fantastic way to learn, get feedback, and just have fun creating with others. "Magma is where artists draw, collaborate, and grow together," and you can "join shared canvases, follow favorite creators, and take part in live art jams." This kind of shared experience can be incredibly motivating and inspiring. It's a very social way to enjoy art, and it opens up a lot of new possibilities for creative projects.
Even if you're drawing on your own, these platforms often make it easy to share your work with a wider community. You can get feedback, see what others are creating, and even contribute to larger data sets that help with machine learning research, as my text mentions about "adding your drawings to the world’s largest doodling data set." This means your simple book drawing could, in a way, help teach a neural network to recognize shapes, which is pretty cool if you think about it. It's a very modern twist on sharing your art.
Tips for Making Your Book Drawings Even Better
Practice is, you know, a very big part of getting better at drawing. The more you draw books, the more natural it will feel, and the more easily you'll be able to capture different styles and perspectives. Don't be afraid to make mistakes; they're just steps along the path to learning. Every line you draw, even the ones you erase, helps you improve. It's a bit like learning to ride a bike; you wobble a lot at first, but then it just clicks.
Observing real books is another great way to improve your drawings. Pick up a book and look at it closely. How do the pages bend? How does the light hit the cover? Where are the shadows? Paying attention to these small details will make your drawings much more convincing. You might also want to look at how other artists draw books for inspiration. There are countless examples online, and seeing different approaches can spark new ideas for your own work. It's really about taking in the world around you and translating it into your art.
Patience is also key. Drawing takes time, and some days you might feel like your drawings aren't quite right. That's perfectly normal! Just keep at it, and you'll see progress. Break down complex drawings into smaller, more manageable steps, just like we did with the book. This makes the whole process feel less overwhelming and more enjoyable. Remember, too, that drawing is supposed to be a fun activity, a way to express yourself, so just enjoy the process.
Frequently Asked Questions About Drawing Books
People often have a few questions when they're starting out with drawing books. Here are some common ones:
How do you draw a book step by step?
You can start with a simple rectangle for the front cover, then add diagonal lines from the corners to give it depth, forming a 3D box shape. Next, add a thin rectangle for the spine on one side, and draw parallel lines on the opposite side for the pages. Finally, add details like a title or cover design. It's a very basic approach, and it works quite well for beginners.
What is the easiest way to draw a book?
The easiest way is to focus on simple shapes. Begin with a flat rectangle, then turn it into a 3D box. Don't worry about perfect lines or intricate details at first. Just get the basic form down. You can always refine it later. Using an online tool that helps you draw perfect shapes, like a rectangle tool, can also make it much simpler, you know, to get started.
How do you draw a stack of books?
To draw a stack, start by drawing one book. Then, draw another book slightly overlapping the first, making sure to keep the perspective consistent. You can vary the sizes, colors, and orientations of each book to make the stack look more natural and interesting. Remember that books in a stack don't always line up perfectly, so adding a slight tilt or offset can make it look more realistic, actually.
Wrapping Up Your Artistic Adventure
So, we've gone through the basic steps of drawing a book, from simple shapes to adding details and even exploring open books and stacks. We also talked about how helpful online drawing tools can be, with their layers, brushes, and easy sharing options. Remember, the key is to start simple, practice often, and really observe the world around you. Every drawing you create, you know, adds to your skill set.
If you're looking to explore more drawing possibilities, or just want to try out some neat digital tools, you can learn more about drawing on our site. There are so many things you can create, and a simple book drawing is just the beginning. And for even more creative ideas and helpful resources, you might want to check out this page on drawing techniques, which has some good tips. Keep drawing, keep experimenting, and most importantly, keep having fun with your art! It's a very rewarding journey, and you're already on your way.
- Uncover The Legacy Of Michael Landon Through Sean Matthew Landon
- Rios Cerca De Mi
- Unveiling The Secrets Of Football Discoveries And Insights From Sport News 24
- Uncover The Unbeatable Polar Vantage V3 Review And Pricing Insights Revealed
- Andrew Kojis Wife Uncovering The Hidden Truth
How To Draw A Book: 7 Easy Step By Step Tutorials | Masha Plans
How To Draw A Book In (7) Easy Steps For Kids
How To Draw A Book: 7 Easy Step By Step Tutorials
