Learning How To Draw A Bow Easily For Everyone
Drawing a bow, like the pretty fabric and ribbon ones that adorn gifts, hair, and clothing, is actually very easy to do. Whether you want to doodle bows in a notebook to channel a charming, coquette style, or you need to add a sweet touch to your artwork, knowing how to draw a bow can really make your creations special. This guide is here to help you learn how to draw a bow in several different styles, showing you each step along the way. It’s perfect for beginners, so you can follow simple instructions to create a beautiful and detailed bow drawing, you know?
- Dylan Mulvaneys Transformative Journey Before And After Insights
- Tori Dunlaps Net Worth Unlocking The Secrets Of Financial Success
- Unleash The Thrill Unveiling The Secrets Of National Speed Sport News Sprints And Midgets
- Dog Looking Up Meme
- Unveiling The Life And Impact Of Andy Cohens Husband Discoveries And Insights
Today, we are going to learn how to draw a bow. Bows are cute accessories that can be worn in the hair or on clothes, and you might also find them on presents, decorations, and more. Drawing a bow may seem simple at first glance, but it’s an excellent way to practice important art skills like symmetry, proportions, and adding little details. This lesson teaches you how to focus on basic shapes, combine them, and really bring your bow to life, you see?
This guide is, in a way, made for beginners, so don't worry if you haven't drawn much before. We will break down the process into easy steps, making sure you can follow along without any trouble. Whether for a school project, an art piece, or just for fun, adding a bow can really give your work a unique touch. We’re going to cover all sorts of bows, from simple ones to those with a bit more flair, and you’ll see how simple it is to get started.
Table of Contents
Getting Started: What You Need
- Unveiling The Extraordinary Journey Of Jeffrey Bruce Livingston
- Unveiling The Profound Meanings Behind Jason Luvs Tattoos
- Uncover The Truth Is Sam Smith Hitched
- Uncover The Thrilling World Of Kenyan Sports Your Ultimate Source Of Discovery
- Unveiling The Origin Of Jamal Musiala Embracing Diversity And Inspiring Dreams
Understanding Bow Basics
The Simple Gift Bow
Step 1: The Core Shape
Step 2: Adding the Loops
Step 3: Creating the Tails
Step 4: Refining the Edges
Step 5: Adding Folds and Shadows
The Hair Bow Style
Step 1: The Central Knot
Step 2: Shaping the Wider Loops
Step 3: Drawing Flowing Tails
Step 4: Giving it Volume
The Ribbon Bow Variation
Step 1: The Initial Ribbon Strip
Step 2: Weaving the Loops
Step 3: The Hanging Ends
Step 4: Adding Texture
Tips for Making Your Bows Shine
Practice Makes Perfect
Frequently Asked Questions About Drawing Bows
Wrapping Up Your Drawing Adventure
Getting Started: What You Need
Before you begin your drawing adventure, it's a good idea to gather a few simple things. You won't need anything fancy, just some basic art supplies. A pencil is, you know, essential for sketching out your initial shapes. You might want one that's easy to erase, so you can make changes without any fuss. An eraser is, of course, a must-have for correcting lines or lightening your sketch marks.
Paper is another key item, naturally. Any kind of paper will do, whether it's a plain piece from a notebook or a dedicated drawing pad. Sometimes, people like to use different types of paper to see how their drawings look. You could even use colored pencils or markers later on if you want to add some color to your finished bow, just to make it pop, you know?
For those who prefer drawing digitally, there are many free online drawing applications available, too. Tools like Drawisland offer a simple, free, and powerful online drawing experience. You can create freestyle drawings and use shapes like rectangles and circles, change sizes, pick colors, and add text. Canva's free drawing tool also lets you add customized drawings and graphics to your designs, so they stand out from the crowd. Magma is where artists draw, collaborate, and grow together, allowing you to join shared canvases and take part in live art jams, which is pretty cool.
Understanding Bow Basics
Every bow, no matter how simple or complex, shares a few basic parts. There's usually a central knot or a gathered part, two loops that extend out, and then the tails that hang down. Getting these parts right is, you know, the secret to drawing any bow. We'll start with the most common kind, the gift bow, and then move on to other styles, too.
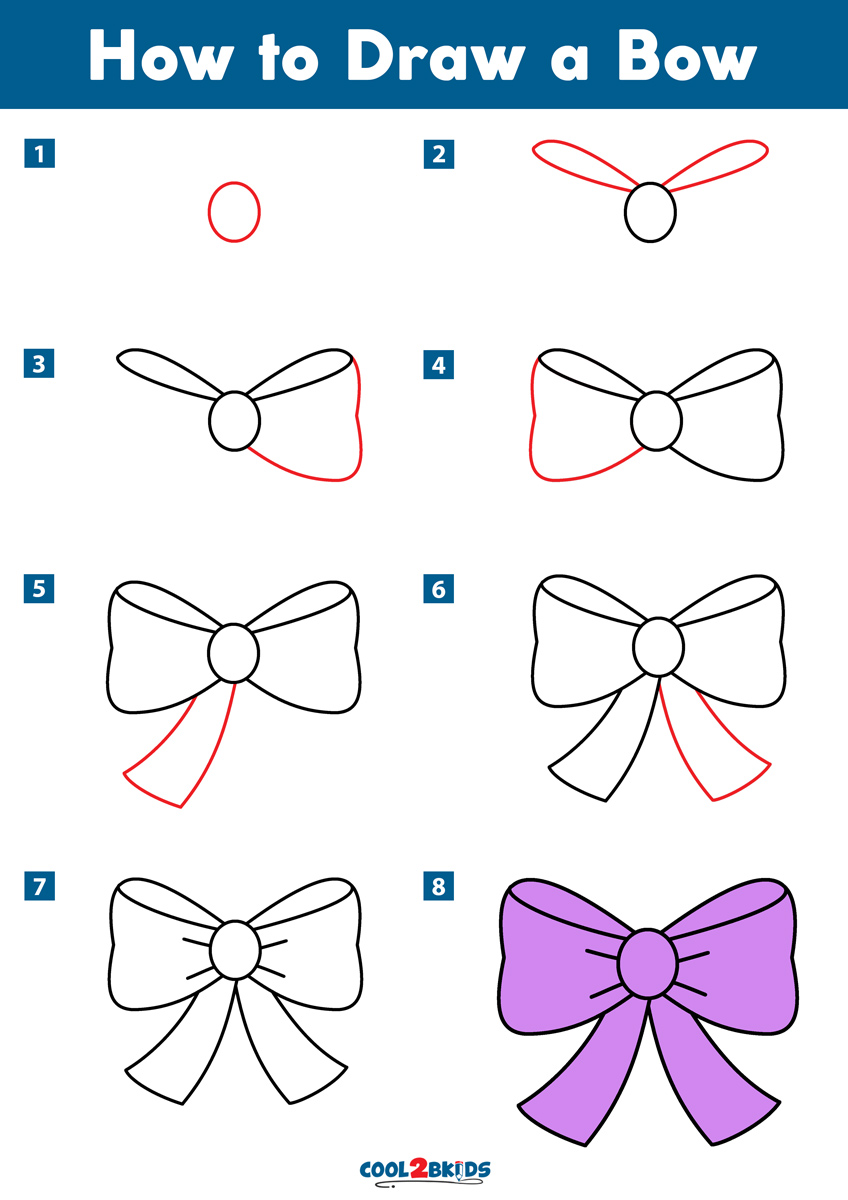
The Simple Gift Bow
This is the kind of bow you see on presents, very classic and sweet. It’s a great starting point because its shapes are quite clear and symmetrical. We will break it down into easy, manageable steps, so you can get it right the first time, or after a little practice, anyway.
Step 1: The Core Shape
To begin, you'll want to draw a small, slightly flattened oval or a simple rectangle in the center of where you want your bow to be. This shape, you see, will act as the knot or the central part of your bow. It doesn't need to be perfect at this stage, just a light guideline to give you a spot to build around. This little center piece is, like, the anchor for everything else.
Think of it as the very heart of your bow, basically. It's what holds all the other parts together visually. Making it a bit flattened helps it look like fabric gathered in the middle, which is, you know, what a real bow does. Keep your lines light here, because you might want to adjust them a little bit later, you know?
Step 2: Adding the Loops
Now, from each side of that central oval, you'll want to draw two large, curving shapes that look like the top half of a heart or a rounded 'M' shape. These are the main loops of your bow, so they should be fairly prominent. Try to make them roughly the same size and shape on both sides to keep your bow looking balanced, which is, you know, important for symmetry.
Each loop should connect back to the central knot. You can, in a way, imagine them puffing out from that center point. Pay attention to the curve; a gentle, flowing curve will make your bow look soft and realistic. You want them to look like they have a bit of air inside, not flat, so, you know, give them some roundness.
Step 3: Creating the Tails
Next, from beneath the central knot, you'll draw two long, flowing strips that extend downwards. These are the tails of your bow. You can make them straight, or give them a gentle curve to suggest movement, which is pretty nice. Some people like to make the ends of the tails look like they've been cut at an angle, like a V-shape, or even just a straight cut, you know?
The length of the tails is up to you; they can be short and neat, or long and dramatic. Just make sure they look like they belong to the bow and are, you know, hanging naturally. These tails add a lot of character to your bow, so, you know, take your time with them. They really complete the look, basically.
Step 4: Refining the Edges
Once you have the basic shapes down, it's time to go over your lines and make them cleaner and more defined. You might want to use your eraser to get rid of any stray sketch lines. Think about the edges of the fabric; they aren't always perfectly sharp. You can add a slight softness to your lines to make the bow look more like fabric, which is, you know, a nice touch.
This step is where your bow really starts to take shape and look finished. You're basically, you know, giving it a polished appearance. Don't be afraid to adjust the curves a little bit if something doesn't look quite right. It's all about making it look just how you want it, you know?
Step 5: Adding Folds and Shadows
To give your bow a more three-dimensional look, you can add some simple lines to suggest folds in the fabric. For instance, inside the loops, you might draw a curved line that follows the outer edge, showing where the fabric folds over itself. Similarly, you can add a small line or two where the tails connect to the central knot, showing where they gather, too.
For shadows, think about where the light would hit your bow. Areas that are tucked under, like beneath the central knot or inside the curves of the loops, would naturally be a little darker. You can use light shading with your pencil to create these shadows, giving your bow depth and making it pop off the page, which is, you know, a cool effect. This step really brings the bow to life, you know?
The Hair Bow Style
Hair bows often have a slightly different look, sometimes a bit fuller or with a more defined central knot. This style is also very easy to draw once you get the hang of the basic bow. It's just a slight variation on the loops and tails, you know?
Step 1: The Central Knot
For a hair bow, the central knot might be a bit more pronounced, perhaps a small, tight rectangle or even a little gathered circle. This part often looks like a separate piece of fabric wrapped around the middle. It's, you know, the focal point where the bow is cinched together. Keep it fairly small and neat, basically.
This central piece really defines the look of the hair bow, so, you know, give it a bit of thought. It's what makes the loops puff out nicely. You can even draw a tiny horizontal line or two across it to suggest the fabric being wrapped, which is a nice detail, you know?
Step 2: Shaping the Wider Loops
Hair bow loops tend to be a bit wider and sometimes a little more puffed out than gift bows. Instead of a simple curve, imagine them as more rounded, almost like soft, plump pillows. They still connect to the central knot, but they might extend further outwards before curving back in, you know?
Try to give these loops a sense of volume. You can achieve this by making their outer edges a bit more rounded and less pointed. They should look soft and full, almost like they're ready to bounce, you know? This wider shape is, like, a key characteristic of many hair bows.
Step 3: Drawing Flowing Tails
Hair bow tails can be quite varied. Sometimes they are short and neat, just peeking out from under the loops. Other times, they are long and flowing, perhaps with a slight wave or curl to them. You can experiment with different lengths and shapes here, you know?
If you want them to look like they're moving, you can give them a gentle S-curve. This adds a sense of grace and softness to the bow. Remember, the tails are, you know, an extension of the loops, so they should look like they're made from the same kind of fabric, basically.
Step 4: Giving it Volume
To make your hair bow look really three-dimensional, focus on adding subtle folds and creases within the loops and tails. These aren't harsh lines, but rather soft indications of where the fabric bunches or overlaps. For example, you might add a light, curved line just inside the bottom edge of each loop to show the fabric folding inward, you know?
Also, consider adding light shading to the areas that would naturally be in shadow, like the underside of the loops or where the tails meet the central knot. This shading, you know, gives the bow a sense of depth and makes it look less flat on the page. It's a small detail that makes a big difference, honestly.
The Ribbon Bow Variation
A ribbon bow can be a bit more structured, sometimes with visible layers of ribbon. This style lets you play with how the ribbon overlaps and twists. It's a fun one to try once you're comfortable with the basics, you know?
Step 1: The Initial Ribbon Strip
Start by drawing a simple horizontal strip of ribbon that will form the base of your bow. This strip will be, you know, the part that goes around the gift or through the hair. It's a straight line, more or less, that gives you a foundation to build upon. Think of it as the starting point for everything else.
This initial strip is, like, the very first piece of the puzzle. It helps you figure out the overall width of your bow and where it will sit on your drawing. Make it as wide as you want your finished bow to be, more or less, you know?
Step 2: Weaving the Loops
Now, imagine how a ribbon is tied. You'll draw the loops by showing the ribbon folding over itself. This means you might draw one loop coming from under the central knot and another loop going over it, creating a sense of weaving. This is, you know, where you can show the ribbon's thickness.
Instead of just simple heart shapes, you'll want to draw the loops with a bit more attention to how the ribbon twists and turns. You might see parts of the ribbon's underside. This layering effect is, you know, what makes a ribbon bow look distinct. It's a bit more detailed, but very rewarding, you know?
Step 3: The Hanging Ends
The hanging ends of a ribbon bow can be quite elegant. They often have a crisp, clean edge, and might even be cut at a sharp angle or have a little notch in the middle. You can draw them extending straight down, or give them a gentle sway, you know?
Sometimes, ribbon tails are quite long and slender, emphasizing the material. You can also draw small lines along the length of the tails to suggest the texture of the ribbon itself, like a slight ridge or pattern. This adds a nice touch of realism, you know?
Step 4: Adding Texture
To make your ribbon bow look even more realistic, you can add subtle textures. If it's a satin ribbon, you might use very light, smooth shading to suggest its sheen. If it's a grosgrain ribbon, you could add tiny, faint horizontal lines to mimic its ribbed texture, you know?
Also, pay attention to how light would fall on the ribbon. Highlights can be added by leaving certain areas lighter, while shadows can be deepened to show where the ribbon folds or overlaps. This really brings the material to life on your page, you know? It's all about making it look believable.
Tips for Making Your Bows Shine
Drawing a bow is, you know, a great way to practice many basic art skills. Here are a few extra tips to help you make your bow drawings even better:
Start Light: Always begin with very light pencil lines. This makes it much easier to erase and adjust your shapes without leaving messy marks. You can press harder once you're happy with your outline, basically.
Practice Symmetry: Bows are often symmetrical, meaning one side mirrors the other. Try to make your loops and tails balanced. You can, you know, even draw a light vertical guideline down the middle of your paper to help you keep things even.
Observe Real Bows: Look at actual bows on gifts, clothes, or in pictures. Notice how the fabric folds, where the shadows fall, and how the loops and tails behave. This is, like, a really good way to learn, you know?
Add Details: Once you have the basic shape, think about adding small details. This could be a tiny knot in the center, a subtle pattern on the ribbon, or even a few stitches. These little things, you know, make your drawing more interesting.
Experiment with Styles: Don't stick to just one type of bow. Try drawing different kinds—big, small, floppy, stiff, you know? The more you experiment, the more comfortable you'll become with various shapes and forms.
Use Shading for Depth: As mentioned, shading is your friend. It helps turn a flat drawing into something that looks like it has volume and dimension. Think about where light would hit and where shadows would naturally form, too.
Don't Be Afraid to Erase: Drawing is a process of refinement. If something doesn't look right, simply erase it and try again. It's all part of learning, you know? Nobody gets it perfect on the first try, basically.
Have Fun: Most importantly, enjoy the process! Drawing should be a relaxing and enjoyable activity. If you're having fun, your creativity will flow more freely, and your drawings will show it, you know?
Practice Makes Perfect
Like any skill, drawing a bow gets easier and better with practice. The more you draw, the more your hand will get used to the shapes and curves. You'll start to notice little details you didn't see before, and your bows will become more natural-looking. It’s a very rewarding feeling, you know, to see your skills grow.
You can try drawing bows in different sizes, from tiny ones for a doodle to large ones for a special art piece. Experiment with various materials, too. Maybe try drawing with a pen, or even digitally using an online tool. Free online drawing applications like Autodraw pair machine learning with drawings from talented artists to help you draw stuff fast, which is pretty neat. You could also use tools that let you paint online with natural brushes, layers, and edit your drawings, inspired by programs like Paint Tool Sai, you know?
Remember, every drawing you make, even the ones you don't love, helps you learn something new. So, keep practicing, keep experimenting, and you'll be drawing beautiful bows in no time, you know? It's all about the journey, basically.
Frequently Asked Questions About Drawing Bows
Is drawing a bow hard for beginners?
Not at all! As you've seen, drawing a bow is quite easy, especially when you break it down into simple steps. This lesson is, you know, created for beginners, focusing on basic shapes and building from there. With a little practice, anyone can learn to draw a beautiful bow, honestly.
What are the most important things to focus on when drawing a bow?
When drawing a bow, the most important things to focus on are symmetry, proportions, and adding details. Getting the loops and tails to look balanced is key, and then adding small folds and shadows will give your bow a realistic, three-dimensional look, you know? It's about building up from simple forms.
Can I draw different types of bows using these basic steps?
Absolutely! The basic steps for drawing a gift bow, hair bow, or ribbon bow are very similar. Once you understand the core components—the central knot, loops, and tails—you can adjust their shapes and sizes to create many different styles. It's, you know, all about playing with those fundamental elements.
Wrapping Up Your Drawing Adventure
So, there you have it! Learning how to draw a bow is a simple and fun skill that can add a unique touch to so many things. Whether you're doodling in a notebook, working on a school project, or creating an art piece, a well-drawn bow can really make your work stand out. We've gone through the process step by step, from the basic gift bow to more varied styles, making sure it's easy for anyone to follow along, you know?
Remember that drawing is all about practice and having a good time. Don't worry about making everything perfect right away. Just keep sketching, keep experimenting with different looks, and keep enjoying the creative process. You'll find that with each bow you draw, your skills will improve, and you'll become more confident in your artistic abilities. You can find more drawing resources and tips on websites like DrawingForAll, which is a great place to explore other drawing lessons, too.
So, why not grab your pencil and paper right now and give it a try? You might be surprised at what you can create. Happy drawing, you know?
- Unveiling Russell Peters Net Worth A Journey To Financial Success
- Aaron Earned An Iron Urn
- Did Will Smith Die
- Unveiling The Matrimonial Status Of Sami Zayn Discoveries And Insights Await
- Uncovering The Heartwarming Story Mike Miles Parents Meet Mother Jeanee Miles
How to Draw a Bow - Cool2bKids
Easy How to Draw a Bow Tutorial and Bow Coloring Page
How to Draw a Bow - Easy Drawing Tutorial For Kids
