How To Draw A Chicken: Your Simple Guide To Farmyard Art Today
Have you ever felt like putting a bit of farm charm onto paper? Maybe you just want to sketch something fun and familiar. Learning how to draw a chicken can be a really enjoyable experience, whether you are just starting out with art or you are looking for a simple, quick project. These feathered friends, with their distinct shapes and quirky personalities, offer a wonderful subject for anyone picking up a pencil or a digital brush. It's truly a rewarding thing to do, you know, to see your own chicken come to life on the page.
Lots of people, it seems, are curious about drawing animals, and chickens are a popular choice. They have such interesting forms, from their round bodies to their pointy beaks and floppy combs. This guide will walk you through the steps, making it quite easy to follow along. You will find that with a few basic shapes, you can create a recognizable and charming chicken drawing, pretty much.
We are going to go over the simple shapes that make up a chicken, and how you can put them together. You can use any drawing tool you like, whether it is a pencil and paper or a free online drawing application. Some of these digital tools, like the one we are thinking about, let you create digital artwork to share online and even export to popular image formats like JPEG or PNG, which is really handy.
- Unveil Hidden Truths Embark On A Journey Of Discovery With I Have No Knowledge Of Any Of This
- Unveiling The Rising Star Discover The Story Of Mason Martin Karns Citys Quarterback Sensation
- Unveiling The Enigmatic Daniel Silber A Musical Journey Of Discovery
- Unveiling The Power Of Selfrespect Navigating Disrespect With Confidence
- Unveiling The Legacy Of Matthew Auld Discoveries And Hidden Truths
Table of Contents
- Getting Ready to Draw Your Chicken
- Basic Shapes for Your Chicken Drawing
- Adding Personality to Your Chicken
- Common Questions About Drawing Chickens
- Your Next Steps in Drawing Chickens
Getting Ready to Draw Your Chicken
Before you make your first mark, it is helpful to think about what you will use. A simple pencil and paper work just fine, of course. If you are using a computer, a free online drawing application can be a really good option. Some of these tools let you paint online with natural brushes, and they even have layers, which is pretty cool. You can import, save, and upload images too, just like you might with other art programs.
It is good to have an eraser close by, whether it is a physical one or the undo button on your digital tool. You might also want to have some reference pictures of chickens. Just a quick look at how they stand or how their feathers sit can be very helpful. This helps you get a sense of their overall form, you know, before you even start.
Remember, the goal here is to have fun and to create something you like. There is no need for perfection. Every drawing is a chance to learn something new, so, just enjoy the process. You are doing great, really.
- Unveiling The Secrets Of Sb19 Before Surgery Discoveries And Insights That Will Transform Your Surgical Journey
- Unveiling Political Strategies With Lucy Caldwell
- Brianna Keilars Pregnancy Journey Uncovering Surprising Truths
- Unveiling Norah Jones Rich Tapestry Of Heritage
- Uncovering The Heartwarming Story Mike Miles Parents Meet Mother Jeanee Miles
Basic Shapes for Your Chicken Drawing
Drawing a chicken is much easier when you break it down into simple shapes. Think about circles, ovals, and maybe some triangles. These are the building blocks for nearly any animal drawing. We will start with the biggest parts first, and then add smaller details. This way of working tends to make the whole process less overwhelming, you know.
Step 1: The Body and Head
Start with a large oval for the chicken's body. This oval should be a bit wider than it is tall, sort of like an egg lying on its side. Place this oval in the middle of your drawing space. It is the main part of your chicken, so give it enough room, basically.
Now, for the head, draw a smaller circle. This circle should go above and slightly to the left or right of the oval, depending on which way your chicken will face. Do not make it too small, but it should be clearly smaller than the body oval. This circle will be the base for the chicken's head, you see.
Connect these two shapes with very light lines. You are just planning out the overall form right now. These lines are like a guide, and you will erase them later. So, do not press too hard with your pencil or digital pen, just a little.
Step 2: Adding the Neck and Tail
To connect the head and body, draw two curved lines for the neck. These lines should start from the bottom of the head circle and gently curve down to meet the top of the body oval. Make the neck a bit wider at the bottom where it joins the body. This gives the chicken a sturdy look, apparently.
Next, let us put in the tail. From the back of the body oval, draw a shape that looks like a large, soft triangle or a fan. This will be the base for the tail feathers. It should point upwards and slightly backwards. Think about how a chicken's tail feathers fan out; this shape is just a starting point for that, more or less.
Remember to keep these lines light. You are still just sketching the overall form. We are building up the chicken piece by piece, you know, so take your time with each part.
Step 3: The Legs and Feet
Chickens have fairly thin legs. From the bottom of the body oval, draw two lines going down. These lines should be slightly angled, almost like a very wide "V" shape. They do not need to be perfectly straight. One leg might be a bit behind the other, which makes the drawing look more natural, actually.
For the feet, at the end of each leg line, draw three short lines pointing forward and one short line pointing backward. These are the chicken's toes. You can make them a bit pointy at the ends. Chickens have scaly legs and feet, so you might add a few small, horizontal lines on the legs later to suggest that texture, just a little.
You are getting closer to a recognizable chicken, aren't you? It is all about building up from those simple shapes, so.
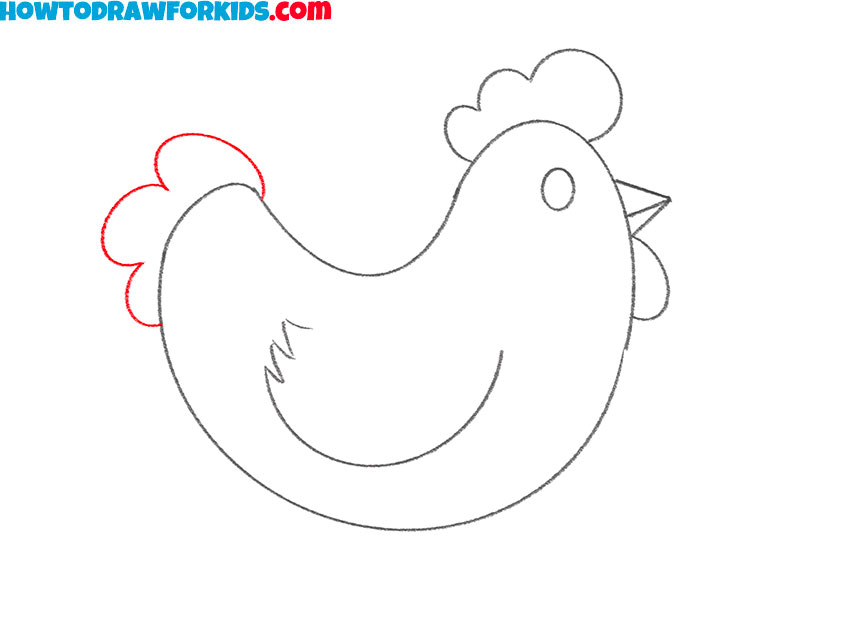
Step 4: Details for the Face and Comb
Now, let us add some character to the head. On the side of the head circle, draw a small circle for the eye. Place it towards the front of the head. You can add a tiny dot inside for the pupil later, too.
Above the eye, on top of the head, draw the comb. This is the fleshy, red part on a chicken's head. It can be spiky or wavy, depending on the type of chicken you are drawing. Just a few bumps will do for a basic chicken. Below the beak, draw the wattle. This is another red, fleshy part that hangs under the chin. It is usually a bit smaller than the comb, typically.
For the beak, draw a small triangle shape on the front of the head, pointing forward. You can divide this triangle with a small line to show the upper and lower parts of the beak. These small details really start to make your chicken look like a chicken, you know.
Step 5: Wings and Feathers
For the wing, draw an oval shape on the side of the chicken's body. It should be about halfway down the body and slightly angled. This oval will be the basic shape of the wing. You can make it look like it is resting against the body, or slightly open if you want a more active pose, so.
Now, let us add some feather details. On the tail, draw some curved lines coming out from the fan shape you made earlier. These lines should suggest individual feathers, getting longer towards the top. On the wing, you can add a few curved lines inside the oval to show the different layers of feathers. You do not need to draw every single feather, just enough to give the idea, more or less.
You can also add some light, short lines along the neck and body to suggest soft feathers. This adds a nice texture to your drawing, apparently.
Step 6: Cleaning Up and Adding Lines
This is where your chicken really starts to take shape. Go over your light sketch lines with a darker line. Use a bit more pressure with your pencil or adjust the brush size on your digital tool. Carefully trace the outline of the chicken, making smooth, continuous lines. This is where you refine the shapes you have made, you see.
Once you have your main outline, you can gently erase the initial light sketch lines. If you are using a digital tool, you might just hide or delete the sketch layer. Now, you should have a clean drawing of a chicken. You can add more details if you like, like tiny scales on the legs or more feather texture, just a little.
Some online drawing applications even let you add customized drawings and graphics to your designs, so they stand out from the crowd. You can use a variety of tools such as brushes, textures, and effects to bring your artistic ideas to life. This means you can color your chicken, add a background, or even try different styles, basically.
Adding Personality to Your Chicken
A chicken drawing does not have to be just a simple outline. You can give your chicken a bit of personality. Think about its pose. Is it standing tall and proud? Is it pecking at the ground? Maybe it is looking curious, or perhaps a bit sleepy. Changing the angle of the head or the position of the legs can make a big difference, you know.
You can also play with expressions. A slightly different eye shape can make a chicken look happy or grumpy. A tiny line above the eye might suggest a thoughtful look. Adding a few lines to show movement, like dust flying up from its feet, can make the drawing more dynamic, too.
Consider the type of chicken. A fluffy Cochin chicken will have a different look than a sleek Leghorn. Thinking about these details can add a lot of charm to your artwork. You might even try drawing a chicken with different feather patterns or colors, which is pretty fun. Free online drawing applications often let you change sizes, pick colors, and add text, which is really useful for this kind of experimentation.
Some tools even pair machine learning with drawings from talented artists to help you draw stuff fast. This can be a cool way to get ideas or to quickly sketch out different chicken concepts before settling on one, so.
Common Questions About Drawing Chickens
People often have questions when they are learning to draw. Here are a few common ones, you know, that might help you out.
How do I make my chicken drawing look more realistic?
To make your chicken look more real, pay attention to the details of its feathers and textures. Look at reference photos of actual chickens. Notice how the feathers overlap, how light hits their bodies, and the texture of their legs. Adding subtle shading can give your drawing depth and make it seem more three-dimensional. Using varied line weights, making some lines thicker and some thinner, also helps create a more realistic feel, you know.
What if my chicken drawing looks lopsided or uneven?
It is very common for drawings to look a bit uneven at first, honestly. The trick is to start with light sketch lines and to constantly compare one side of your drawing to the other. If you are drawing digitally, you can often flip your canvas horizontally to spot unevenness more easily. Do not be afraid to erase and redraw parts until they look balanced. Practice really helps with getting things symmetrical, you know, or at least looking balanced, more or less.
Can I draw different types of chickens using these steps?
Absolutely! The basic shapes we covered are a foundation for almost any chicken breed. Once you have the basic body, head, and tail down, you can adjust the details to fit different types. For example, a Silkie chicken has very fluffy feathers, so you would draw softer, rounder lines for its body and head. A rooster would have a much larger, more elaborate tail and comb. These steps give you a good starting point, and you can adapt them quite easily, basically.
Your Next Steps in Drawing Chickens
You have taken the first steps to drawing a charming chicken, which is really great. The most important thing is to keep practicing. Each time you draw, you will learn something new about shapes, proportions, and adding character. Do not be afraid to experiment with different poses or even different art styles. You might try drawing a cartoon chicken, or a more detailed, realistic one, you know.
Consider using some of the fantastic online tools available. Some platforms let artists draw, collaborate, and grow together. You can join shared canvases, follow favorite creators, and take part in live art jams. This can be a really fun way to get feedback and inspiration, too. You can also explore free online drawing applications that help teach by adding your drawings to a large doodling data set, shared publicly to help with machine learning research. This is a neat way to contribute to something bigger, so.
So, keep sketching, keep creating, and most of all, keep enjoying the process of making art. There is so much joy in seeing your own creations come to life. To learn more about drawing on our site, and check out this page for more creative ideas. You can also find more art tips and tricks at a site dedicated to art education.
- Unraveling The Mystery Ontario Brian Renaud Accident And Its Impact
- Where Is Mount Everest
- Discover Marc Evan Jacksons Net Worth Unlocking Wealth And Success
- Andrew Kojis Wife Uncovering The Hidden Truth
- I Used To Pray For Times Like This

How to Draw a Chicken - HelloArtsy
How to Draw a Chicken - Easy Drawing Tutorial For Kids

How To Draw a Chicken - EASY Drawing Tutorial!
