How To Draw A Mouth: Your Guide To Expressive Lips And Smiles
Have you ever felt a bit stuck when trying to draw a mouth that truly shows what someone is feeling? It's a very common thing, you know. The mouth, it's such a powerful part of the face, telling us so much about mood and expression in a work of art, so. From a soft smile to a smirk, or even a big grin, getting those feelings across on paper can feel like a real puzzle.
If you’ve ever struggled with how to draw a mouth, we are here to help, as a matter of fact. This guide is constructed to make the process clearer and more approachable. We will cover how to draw a mouth step by step, starting by getting to know the structure of the mouth and lips, too it's almost.
By the end of this tutorial, you will have learned various ways to make your drawn mouths look more real and full of life. Drawing a mouth is not hard to do, honestly. Just like any other type of drawing, it is mostly about observation, you see. This tutorial gives you a basic look at the shapes and anatomy needed for drawing realistic mouths, pretty much.
- Unveiling The Visionary Impact Of Chris Carlos On Atlanta
- Unveiling The Unbreakable Bond Mark Wahlberg And Reese Witherspoons Enduring Friendship
- Dylan Mulvaneys Transformative Journey Before And After Insights
- Unveiling The Extraordinary Journey Of Jeffrey Bruce Livingston
- Unveiling The Truth Lauren Germans Husband And Relationship Status
Table of Contents
- Why Learning How to Draw a Mouth Matters So Much
- Getting Started: The Basic Shapes of a Mouth
- Understanding Mouth Anatomy for Realism
- Step-by-Step Guide to Drawing a Realistic Mouth
- Common Mistakes and How to Avoid Them
- Drawing Mouths for Different Expressions
- Tools and Techniques: Pencil, Pen, or Digital
- Frequently Asked Questions About Drawing Mouths
Why Learning How to Draw a Mouth Matters So Much
Mouths show feelings, you know? They are a central part of how we communicate without words. Think about it: a slight curve can mean happiness, while a downturned shape can show sadness, or something like that. Because mouths can tell us a lot about the mood and expression in a work of art, learning to draw them well really helps your characters come alive on the page, more or less.
It is really about observation, that's what it comes down to. When you learn to see the subtle shifts in a mouth's shape, how light hits it, or how it sits on the face, your drawings become much more believable. Do you want to draw a mouth as realistically as possible? This guide helps you train your eye, you know.
Getting Started: The Basic Shapes of a Mouth
Every drawing starts with simple shapes, and mouths are no different, you see. Our pencil study of a mouth is broken down into three steps to help you understand each stage of the drawing process. We start with the initial line drawing, then work through the application of details, pretty much.
- Unveiling The Power Discover The Functionality Of Bdnaashcom
- Unveiling Beverly Dangelo A Journey Of Talent Resilience And Enduring Legacy
- Unveiling Eduardo Saverins Wealth Lifestyle And Impact
- Pink Skies Zach Bryan
- Chico Lachowski Side Profile
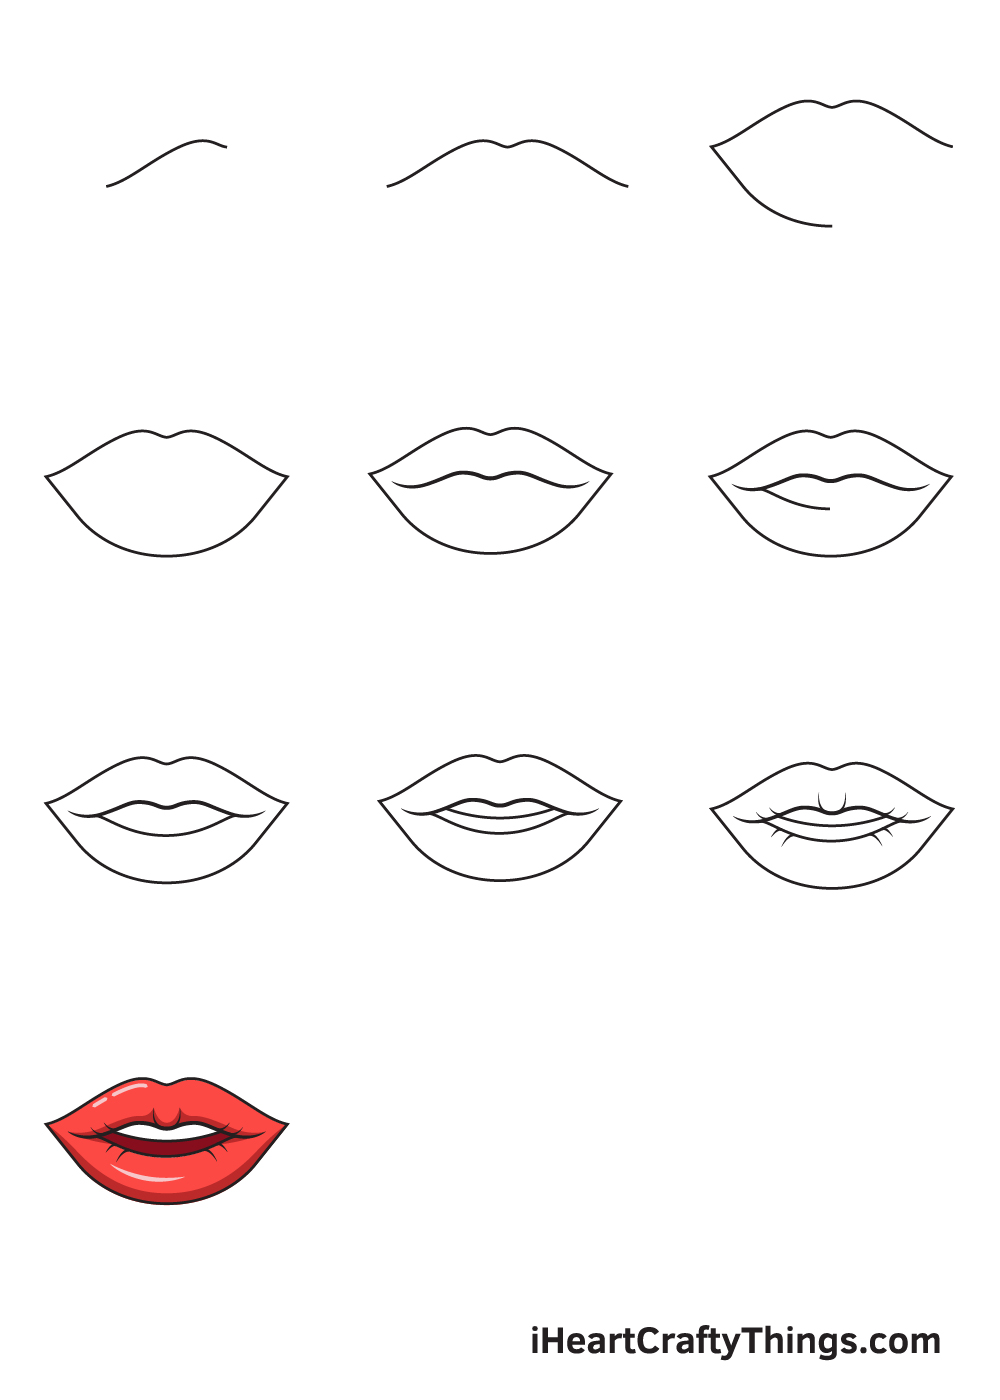
The Foundation Line
To draw a mouth, start by drawing a horizontal line with the ends tilted upwards, so. This line is like the center point of the mouth, where the upper and lower lips meet, you know. It sets the overall width and the general direction of the mouth, which is very important.
This initial line might be almost straight for a neutral expression, or it could curve more for a smile or frown, actually. It's the anchor for everything else you will draw around it, kind of. Getting this first line right saves you a lot of trouble later, you know.
Arches and Curves
Next, sketch an arch above and below the horizontal line, making sure the arches stretch the full length of that first line, pretty much. These arches are your first step in giving the lips their basic volume and shape. The upper arch usually has a more defined dip in the middle, which is called the Cupid's bow, you see.
The lower arch, on the other hand, is often smoother and more rounded, more or less. Think of these arches as gentle guides that will help you shape the lips. They are not hard lines, but rather soft suggestions of where the lips will be, you know.
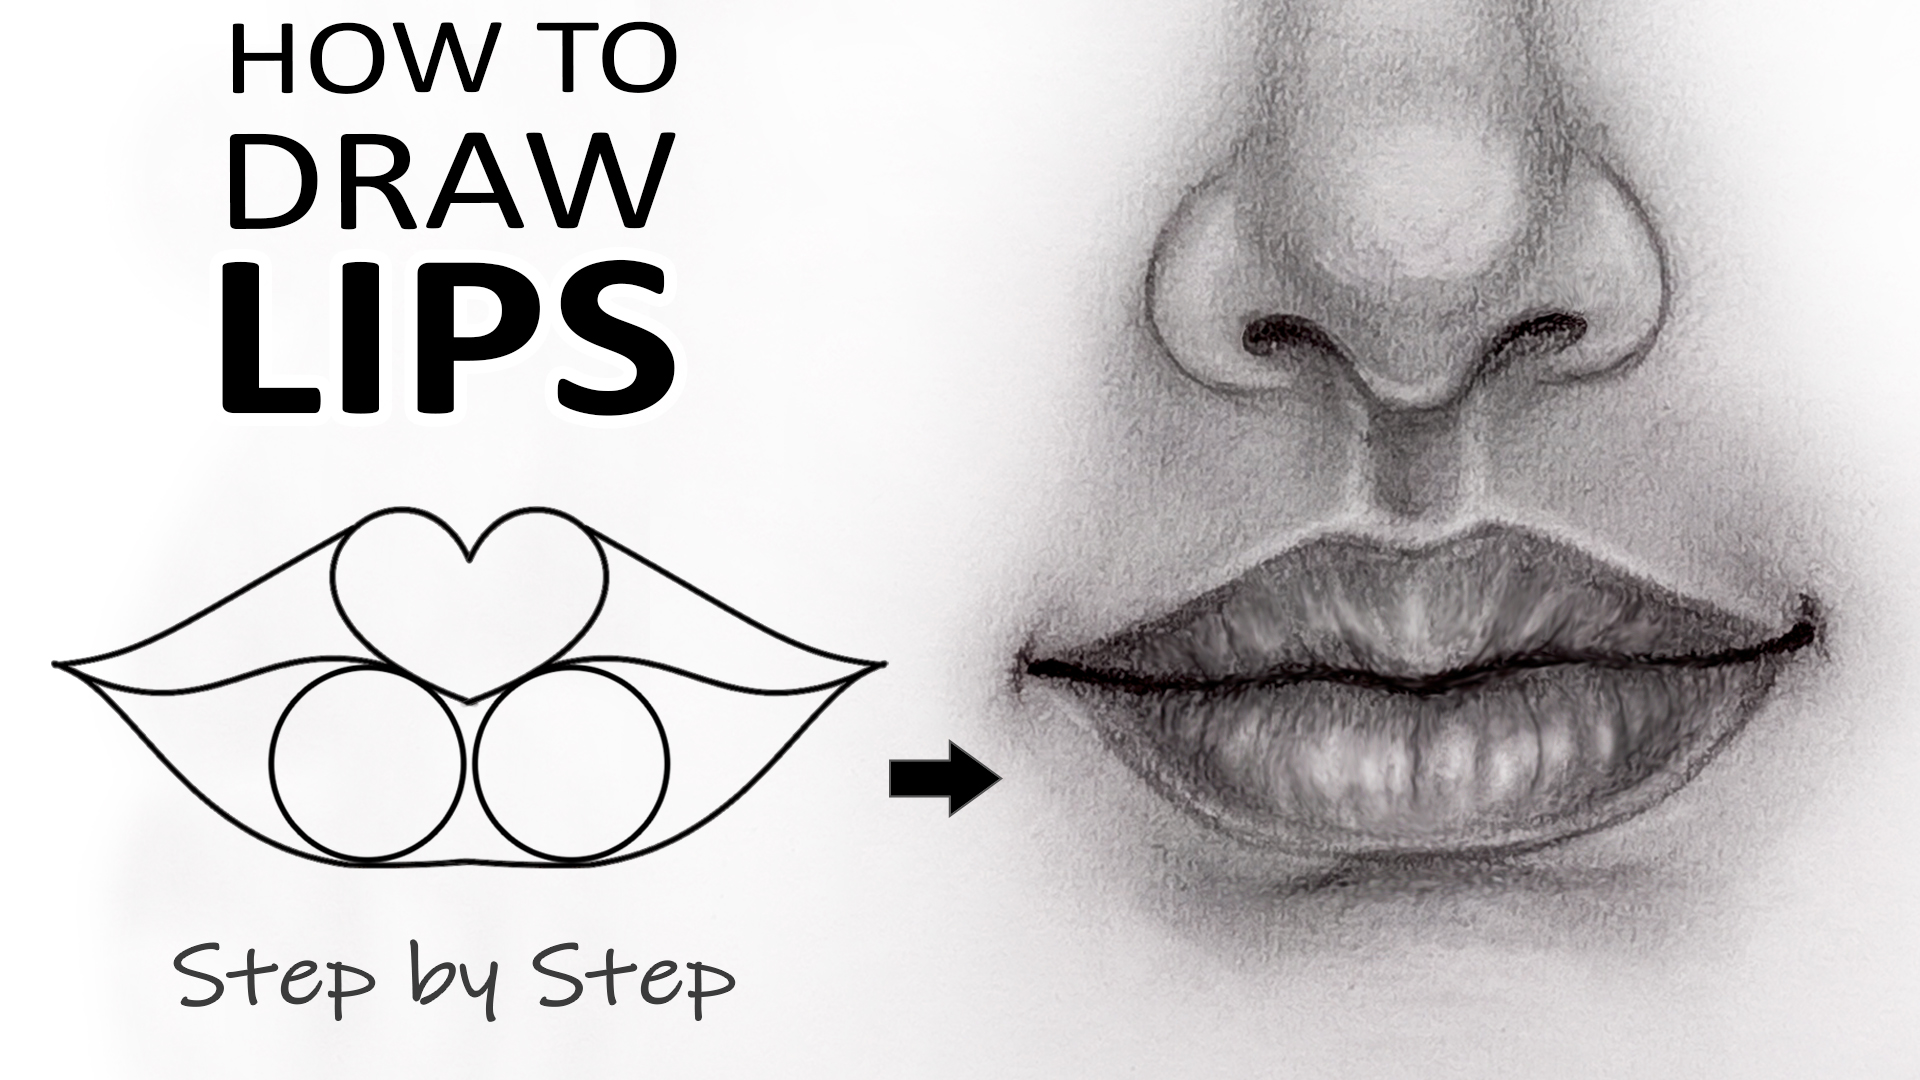
Understanding Mouth Anatomy for Realism
To draw a mouth that looks real, you need to know a bit about its structure, that's for sure. It's not just about drawing two shapes; it's about understanding what makes those shapes, you know. Once you have the basics, we will show you how to add more depth.
Knowing the parts of the mouth helps you make better decisions about shading and form, pretty much. It helps you avoid common mistakes beginners often make, and my tips will show you how to fix them, you know. It's like knowing how a machine works before you try to fix it, sort of.
The Philtrum and Cupid's Bow
Above the upper lip, there is a shallow groove called the philtrum, you know. This groove runs from the base of the nose down to the top of the upper lip. The philtrum often creates a slight shadow, which adds a lot to the realism of your drawing, you see.
The Cupid's bow is the distinct double curve at the center of the upper lip, pretty much. It's a key feature that gives the upper lip its unique shape. How pronounced it is can vary from person to person, so pay attention to your reference, you know.
The Vermillion Border
This is the sharp line that separates the colored part of the lips from the surrounding skin, you know. It's often a bit raised and can catch the light, creating a subtle highlight. Drawing this border accurately helps define the lips and makes them look more three-dimensional, as a matter of fact.
Sometimes, this border is very crisp, and other times it's softer, depending on the person and the lighting, you see. Paying attention to this detail really makes a difference in how real your lips look, more or less.
Oral Commissures (Corners of the Mouth)
These are the points where the upper and lower lips meet at the sides, you know. The corners of the mouth are incredibly important for showing emotion. A slight tilt up or down here can completely change an expression, pretty much.
When someone smiles, these corners pull back and often create little folds or wrinkles in the skin, you see. When someone frowns, they might pull down. These small details are very telling, so.
Muscle Structure (Orbicularis Oris)
The lips are essentially a ring of muscle called the orbicularis oris, you know. This muscle allows the lips to pucker, smile, frown, and move in many ways. While you do not need to draw every muscle fiber, understanding that the lips have volume and are shaped by muscle helps you draw them with more form, pretty much.
Think of how the lips push out or pull in, and how that affects the shadows and highlights, you see. This muscle is connected to other facial muscles, which is why expressions spread across the whole face, kind of.
Step-by-Step Guide to Drawing a Realistic Mouth
In this tutorial, we will cover how to draw a mouth step by step, starting by getting to know the structure of the mouth and lips, you know. This will be a realistic representation of a mouth, lips, and teeth using a grid as a foundation, if you like that method.
Step 1: The Initial Sketch – Getting the Proportions Right
Begin with that horizontal line, tilted slightly up at the ends, you know. This line will guide the overall width of the mouth and its general expression, like your, a lot of people find this helpful. It's the very first mark you make, giving you a base to build upon, pretty much.
Add those upper and lower arches, making sure they stretch across the length of your horizontal line, more or less. These arches should be light and loose, just guiding you to the general shape of the lips. They are not meant to be perfect outlines yet, you see.
Consider using a grid for accuracy, like your, a lot of artists do. This helps you keep things symmetrical and in proportion, especially if you are working from a reference photo, you know. It's a simple way to break down a complex shape into smaller, more manageable parts, as a matter of fact.
Step 2: Refining the Lip Shapes and Form
Now, it's about giving those basic shapes some life, kind of. Start to refine the outer contours of the lips, paying attention to the Cupid's bow on the upper lip, it's pretty distinct. This is where you start to see the individual character of the mouth emerge, you know.
The lower lip, too, often has a gentle curve or two, as a matter of fact. Look for the subtle bumps and indentations that give lips their unique form. Remember, lips are not flat; they have volume and curve around the teeth and jaw, you see.
Think about the slight swelling of the upper lip and the fuller, more rounded shape of the lower lip, pretty much. Use light, soft lines at this stage, so you can easily adjust them. This is where observation really comes into play, you know.
Step 3: Adding Depth and Expression – Shading and Details
This is where your mouth drawing really starts to pop, you know. Light and shadow play a big part here, so. Think about where the light source is coming from and how it creates highlights and shadows on the lips. The philtrum, for example, often has a subtle shadow, as a matter of fact.
The area just under the lower lip often has a shadow, too, which helps the lip look like it's coming forward, you see. Add soft shading to show the curves and folds of the lips. The corners of the mouth are very important for expression, you know, and often have small shadows or creases.
Consider the teeth if they are showing, just a little bit. Usually, you do not draw every single tooth; instead, suggest them with subtle lines and shadows, pretty much. The space between the lips, where they meet, is often the darkest area, so make that line clear, you know. This step is about building up layers of tone to create a sense of realism and dimension, honestly.
Common Mistakes and How to Avoid Them
A lot of people make similar errors when drawing mouths, you know. Knowing what these common pitfalls are can help you avoid them in your own work, pretty much. It's like learning from others' experiences, so.
Making Lips Too Flat
One common issue is drawing lips as if they are flat cutouts on the face, you know. Remember, lips have volume and curve around the underlying bone structure. Use shading and highlights to show this roundness, as a matter of fact. Think of them as soft, fleshy forms, not just outlines.
Ignoring Anatomy
Sometimes, artists forget about the philtrum or the Cupid's bow, or how the corners of the mouth behave, you see. These small anatomical details add so much to the realism. Pay attention to how these parts interact, and your drawings will look much more believable, honestly.
Overdoing the Teeth
When teeth are visible, a common mistake is drawing every single tooth with a dark outline, you know. This can make the mouth look too busy or even a bit scary, pretty much. Instead, suggest the teeth with light lines and focus on the shadows between them, and the overall shape of the dental arch, you see. Often, you only see the top half of the upper teeth, if any at all.
Symmetrical Everything
While faces generally have symmetry, no face is perfectly symmetrical, you know. Lips, especially when expressing emotion, can be slightly uneven. One side might be a little higher or lower, or one corner might pull back more than the other, as a matter of fact. Embrace these slight imperfections to make your drawing look more natural, pretty much.
Not Capturing Emotion
After all, the mouth conveys so many emotions, from a frown to a soft smile to a smirk to a big grin, you see. If your mouth looks stiff, it might be because you are not thinking about the emotion it is supposed to show, you know. Practice drawing different expressions to get a feel for how the mouth changes with each feeling, honestly.
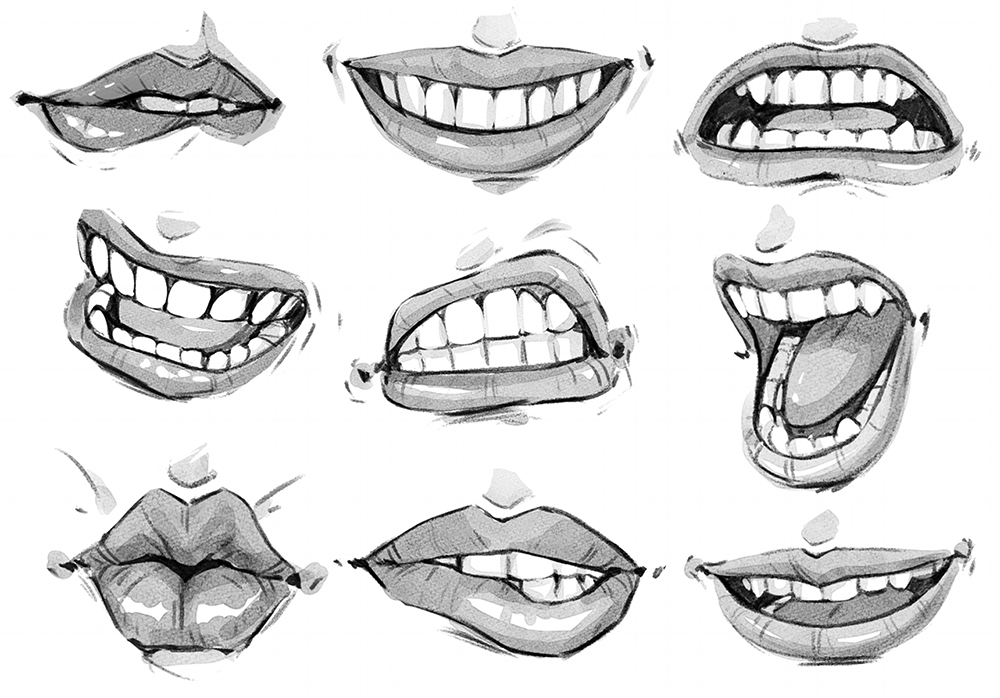
Drawing Mouths for Different Expressions
The mouth, it's really a powerhouse of emotion, you see. Learning how to draw a mouth that truly expresses feeling is a big step in bringing your characters to life. Just a slight change in the curve or the corners can tell a whole story, you know.
A Gentle Smile
For a gentle smile, the horizontal line of the mouth curves slightly upwards, you know. The corners of the mouth pull back just a little, and you might see very subtle crinkles at the sides, pretty much. The lips remain relatively full, and the teeth are usually not visible, or just barely, you see.
A Frown
A frown typically shows a downturned curve in the horizontal line of the mouth, you know. The corners of the mouth pull downwards, and the upper lip might press down a bit, as a matter of fact. There might be some tension around the mouth area, showing concern or sadness, pretty much.
A Smirk
A smirk is a very interesting expression, you see. It often involves one side of the mouth curving up slightly, while the other side remains more neutral or even pulls down a tiny bit, you know. It suggests a hidden thought or a bit of mischief, honestly. The asymmetry is key here, pretty much.
A Big Grin
For a big grin, the mouth stretches wide, and the corners pull far back and up, you know. You will likely see a lot of the upper teeth, and possibly some of the lower ones, as a matter of fact. The lips become thinner as they stretch, and deep creases might form around the mouth and cheeks, you see. This expression shows a lot of happiness or excitement, pretty much.
Tools and Techniques: Pencil, Pen, or Digital
Whether you are using a pencil, a pen, or a graphic tablet, the core principles remain, pretty much. The basic shapes, anatomy, and understanding of light and shadow are universal, you know. How to draw a mouth with a pen or graphic tablet involves adapting these same ideas to different tools, as a matter of fact.
Pencil Drawing Tips
Pencils are great for beginners because they allow for easy corrections and building up tones, you know. Start with a light pencil (like a 2H) for your initial sketch, then move to softer pencils (like HB, 2B, 4B) for shading and darker lines, pretty much. Use a blending stump or tissue for smooth transitions in your shading, you see.
Pen/Ink Drawing Tips
Drawing with a pen means you need to be more confident with your lines, you know. You cannot erase, so focus on light, quick strokes to build up your shapes. Use cross-hatching or stippling to create shadows and texture, pretty much. Different pen nib sizes can give you varied line weights, which is helpful, you see.
Digital Drawing Tips
On a graphic tablet, you have a lot of flexibility, you know. Use layers for your sketch, line art, and shading, which makes editing very easy, pretty much. Experiment with different brushes to mimic pencil textures or smooth airbrush effects, you see. The pressure sensitivity of your tablet can help you control line thickness and opacity, honestly.
Frequently Asked Questions About Drawing Mouths
How do you draw a mouth for beginners?
For beginners, start with a simple horizontal line, then add arches above and below it to form the basic lip shapes,
- Uncover The Secrets Of Skip The Game Odessa A Journey Of Discovery
- Louise Meldrum Uncovering The Secrets Of Success And Impact
- Uncover The Legacy Of Michael Landon Through Sean Matthew Landon
- Unveiling Eduardo Saverins Wealth Lifestyle And Impact
- Unveil The Enchanting World Of Zach Galifianakis Beloved
How to draw a mouth and lips | Art Rocket
How To Draw A Mouth
How To Draw A Mouth Step By Step Realistic
