Mastering Hand Drawing: Your Simple Guide To How To Draw Hands
Learning how to draw hands can feel like a real mountain to climb for many artists, especially if you're just starting out. They are, quite honestly, one of the most expressive and complex parts of the human body to capture on paper, or on a screen, yet. Hands show so much emotion, tell so many stories, and are just a little bit tricky to get right.
But don't you worry, because today, we're going to guide you through the process of learning to draw hands. We'll break it down into easy, beginner-friendly steps, and you'll see that it's not nearly as impossible as it might seem, in a way.
Whether you're sketching on paper or using a free online drawing application, like the one we offer, these tips will help you get perfect proportions and nail those hand gestures. Our application, for instance, lets you create digital artwork to share online and export to popular image formats like JPEG, PNG, SVG, and PDF, so you can practice right away, too it's almost.
- Monster High School Dress To Impress
- Unveil The Latest Sports News And Discoveries For February 4 2024
- Restaurante Colombiano Cerca De Mi
- Unveiling The Riches Madisyn Shipmans Net Worth Explored
- Tori Dunlaps Net Worth Unlocking The Secrets Of Financial Success
Table of Contents
- Introduction to Drawing Hands
- Understanding Hand Basics
- Learning Hand Anatomy
- Achieving Realistic Proportions
- Capturing Hand Gestures and Expressions
- Step-by-Step Drawing Process
- Practicing with Digital Tools
- Frequently Asked Questions About Drawing Hands
- Conclusion: Keep Practicing!
Introduction to Drawing Hands
So, you want to learn how to draw hands, that's great! Many people find this a tough spot, but with a bit of guidance, it becomes much more manageable. Our goal here is to give you an easy, beginner-friendly tutorial that will help you out, you know. We'll cover everything from basic shapes to getting those convincing hand gestures.
This guide will help you whether you're using traditional pencils and paper or our free online drawing application. Our app lets you create digital artwork, and it's really easy to use. You can draw, edit photos, or even design your next business card with it, too it's almost.
Remember, drawing hands takes practice, but with the right approach, you'll see improvement quickly. We'll study and learn the measurements of the hand, and then put that knowledge to good use, basically.
- Shemar Moore And Sanaa Lathan Uncovering Their Impact And Legacy
- Uncover The Truth Jaiden Animations Sexuality And Pronouns Revealed
- Unveiling The Truth Alicia Menendezs Marital Status Revealed
- Unleash The Thrill Unveiling The Secrets Of National Speed Sport News Sprints And Midgets
- Peso Pluma New Haircut
Understanding Hand Basics
Before you start putting lines down, it helps to think of the hand in simpler forms. It's not just a blob of fingers, you know. It has distinct parts that work together, and understanding these will make your drawing process much smoother, that is that.
The Palm and Fingers
Think of the hand as two main sections: the palm and the fingers. The palm is like a broad, somewhat flat shape, while the fingers are cylindrical forms attached to it. This simple idea helps a lot with getting the overall structure right, actually.
The palm itself isn't perfectly flat; it has a slight curve and some padding. When you're learning how to draw hands, recognizing this basic division is a really good first step. It helps you to place everything else accurately, in a way.
Basic Shapes for Hands
To begin, try to simplify the hand into very basic shapes. You can think of the palm as a sort of trapezoid or a slightly rounded rectangle. The fingers can be seen as a series of connected cylinders or even just simple lines at first, sort of.
For example, some artists start with a "mitten" shape for the palm and thumb, then add lines for the fingers. This approach helps you get the overall flow and proportion before you worry about the smaller details. It's a bit like building a house with big blocks before adding the windows, you know.
Learning Hand Anatomy
You don't need to become a doctor, but knowing a little about hand anatomy will really help you draw realistic and convincing hands. It's about understanding what's underneath the skin that makes the hand move and look the way it does, obviously.
Bones and Joints
The hand has a lot of bones! There are the wrist bones (carpals), the palm bones (metacarpals), and the finger bones (phalanges). Each finger, except the thumb, has three phalanges, and the thumb has two. These bones meet at joints, which are the knuckles you see, basically.
When you're drawing, pay attention to where these joints are. They create the bumps and folds on the skin and dictate how the fingers bend. If you get the joints in the right places, your hand will look much more natural, you know.
Muscles and Tendons
Even though hands might seem bony, they have a surprising amount of muscle, especially in the palm and around the thumb. These muscles create the fleshy pads you see. Tendons are like cords that connect muscles to bones, and you can often see them on the back of the hand when the fingers are extended, for example.
Understanding these muscles and tendons helps you add volume and realism. They affect the overall shape and how light hits the hand. When you draw, try to think about these underlying structures, as a matter of fact.
Achieving Realistic Proportions
Getting the proportions right is super important when learning how to draw hands. Even if you get the anatomy perfect, if the fingers are too long or the palm is too small, it just won't look right. It's about finding that balance, you know.
Measuring the Hand
A common rule of thumb (pun intended!) is that the length of the middle finger is often about the same length as the palm itself. This is a really handy measurement to keep in mind. You can also compare the width of the palm to its length, which is usually a bit wider than half its length, sort of.
Use your own hand as a reference. Look at how your fingers relate to your palm, and how the different fingers relate to each other. This direct observation is incredibly helpful, you know.
The Thumb and Fingers
The thumb is unique. It's shorter and thicker than the other fingers and attaches lower on the hand. Its movement is different too, which is why it's so versatile, you know. When drawing, make sure the thumb looks like it's coming from the side of the palm, not just another finger growing from the top, basically.
For the other fingers, remember they aren't all the same length. The middle finger is the longest, followed by the ring finger, then the index finger, and finally the pinky. They also taper slightly towards the tips. These subtle differences make a big impact on realism, pretty much.
Capturing Hand Gestures and Expressions
Hands are incredibly expressive. They can show anger, joy, sadness, surprise, and so much more. Learning how to draw hands means learning to capture these gestures. This is where the real fun begins, you know.
Common Hand Poses
Start by observing common hand poses: a fist, an open palm, pointing, holding something, waving. Try to understand the underlying structure of each pose. For a fist, the fingers curl into the palm, and the knuckles become prominent, for example.
You can use our free online drawing application to practice these poses. It's easy to draw, edit photos, or design your next business card. You can even make a quick photo edit with the drag and drop feature, or draw the letter "s" to take a shortcut to the style chooser, which is pretty neat, you know.
Adding Emotion
To add emotion, think about the tension in the hand. A relaxed hand will have softer curves, while a tense hand might have sharper angles and more visible tendons. A happy hand might be open and welcoming, while a worried hand might be clasped or fidgeting, in a way.
Practice drawing hands in various emotional states. Look at photos, or even your own hand in a mirror, and try to capture the feeling. This is where your drawing really starts to tell a story, you know.
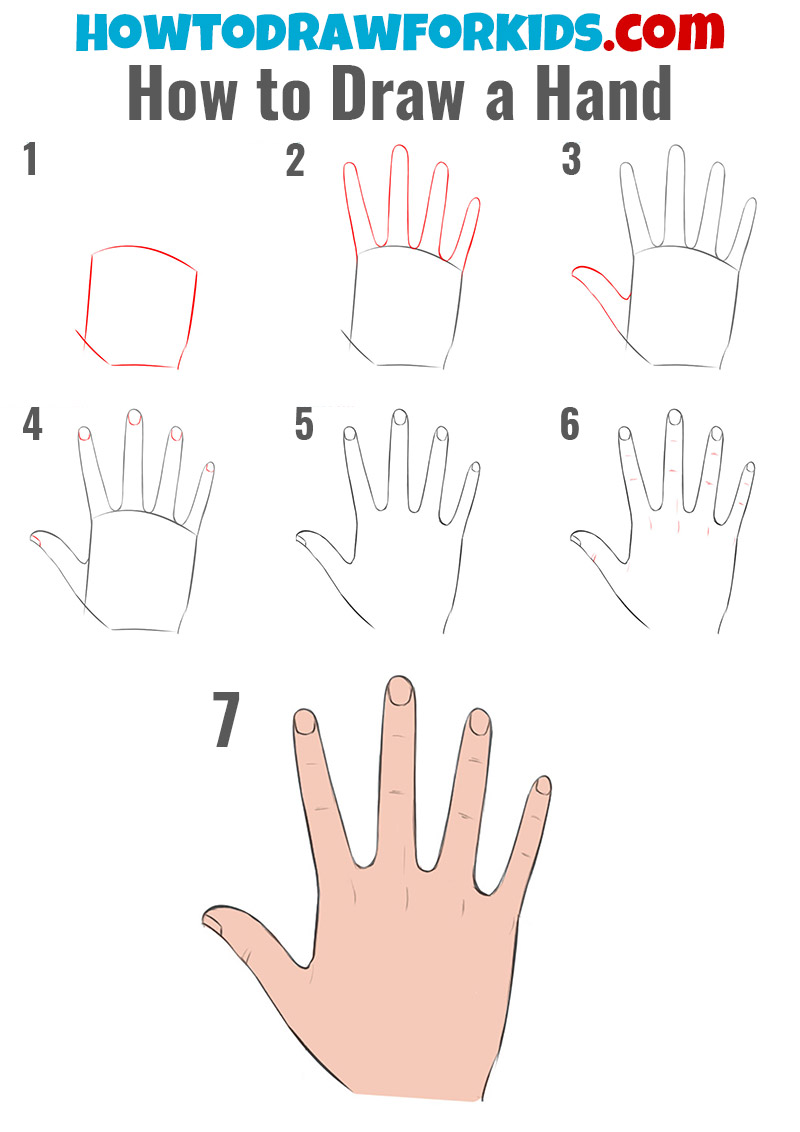
Step-by-Step Drawing Process
Now, let's put it all together into a simple, step-by-step guide for drawing hands. This process is designed to be easy for beginners and will help you build up your drawing piece by piece, you know.
Stage 1: The Block-in
Start by lightly sketching the largest, most basic shapes. Think of the palm as a simple block or a rounded rectangle. Then, add a smaller, simpler shape for the thumb, and lines for where the fingers will go. Don't press too hard, these are just guidelines, sort of.
This stage is about getting the overall size and placement right. It's like setting up the skeleton of your drawing. If you get this wrong, the rest of the drawing will be off, so take your time here, you know.
Stage 2: Refining Shapes
Once your basic block-in is done, start to refine those shapes. Turn the rectangular palm into something more organic, with a slight curve. Start to add the basic cylindrical forms for the fingers, paying attention to their lengths and how they attach to the palm, pretty much.
At this point, you're still working with simple forms, but they're starting to look more like a hand. Think about the general direction of each finger and the overall gesture of the hand, you know.
Stage 3: Adding Details
Now, you can start adding the smaller details. This includes the knuckles, the folds of skin at the joints, and the fingernails. Pay attention to the subtle bumps and curves that define the hand's surface. This is where your knowledge of anatomy really comes in handy, you know.
Don't try to draw every single wrinkle, just the main ones that define the form. Remember, less is often more when it comes to details, you know.
Stage 4: Shading and Form
Finally, add shading to give your hand drawing depth and form. Think about where the light source is coming from and how it creates highlights and shadows. Shadows will define the muscles and bone structure, making the hand look three-dimensional, basically.
Use lighter shading for areas facing the light and darker shading for areas in shadow. Blending your shades will create a smoother, more realistic look. Our free online drawing application has tools that make shading really easy, you know.
Practicing with Digital Tools
Our free online drawing application is a fantastic tool for practicing how to draw hands. You can easily draw, edit photos, or design your next business card. It's made for all ages, and you can create digital artwork to share online, which is pretty cool, you know.
You can quickly make a quick photo edit with the drag and drop feature, or use shortcuts like drawing the letter "s" to get to the style chooser. While holding a button, you can tap the screen with different finger combinations to access tool presets that have been set up in the tool, which is super handy, you know.
There are also videos for tips and tricks on how to use our application and get the most out of the app. Learning to draw hands becomes much more flexible when you can easily undo mistakes and experiment with different brushes and colors, you know. Learn more about our application's features on our site, and you can also find more tutorials on this page.
Other resources, like Skillshare, for example, offer beginner's guides to drawing hands that cover basic hand anatomy, hand gestures, and shading techniques. You can find their beginner's guide to drawing hands here, if you're looking for more learning options, you know.
Frequently Asked Questions About Drawing Hands
Q1: Why are hands so difficult to draw?
Hands are tough because they have a lot of small, moving parts and can take on so many different shapes and gestures. They also have complex underlying anatomy, which makes them a bit of a challenge to get right, you know.
Q2: What's the best way for a beginner to start drawing hands?
The best way to start is by simplifying the hand into basic shapes like rectangles and cylinders. Focus on getting the overall proportions and placement right before adding details. Practice drawing your own hand in different poses, too it's almost.
Q3: How can I make my hand drawings look more realistic?
To make them look more realistic, study basic hand anatomy to understand the bones and muscles. Pay close attention to proportions, and practice shading to give your drawings depth and form. Observing real hands is super important, you know.
Conclusion: Keep Practicing!
Learning how to draw hands might seem like a big task, but with this easy step-by-step guide, you're well on your way. We've talked about basic hand anatomy, getting the right proportions, and capturing convincing hand gestures, and stuff. Remember, practice is truly key here, you know.
Our free online drawing application is a great tool to help you on this journey. It lets you easily draw and create digital artwork, giving you a perfect place to put these new skills to use. So, grab your digital pen or mouse, and start drawing those hands today!
- Discover The Untold Story Of Gymnastics Legend Olga Korbut
- I Just Lost My Dawg Lyrics
- Unveiling Mysteries Elizabeth Youssefs Illness Explored
- Unlock Exclusive Snoop Dogg Updates Uncover Contact Secrets
- Unveiling The Secrets Christopher Seivrights Height Weight Net Worth And More
How to Draw a Hand - Easy Drawing Tutorial For Kids

How to Draw a Hand Step by Step | How to draw hands, Easy hand drawings

How to Draw Hands For Beginners - Alicja Prints
